「Dive Into Python 3」フィボナッチ数列ジェネレータ
http://diveintopython3-ja.rdy.jp/generators.html#a-fibonacci-generator
のyieldの処理が意味不明だった。。。
こちらの説明がわかりやすかった。
pythonのyieldにハマったから、初心者なりに解明してみた
http://aipacommander.hatenablog.jp/entry/2014/06/15/104756
yeild使えそう!
あとフィボナッチ数列とは(Wiki)
2016年1月30日土曜日

2016年1月25日月曜日
pythonで CSVファイルを読み込み、一列ごと空けてファイルへ書き込む
#! /usr/bin/env python
# -*- coding: utf-8 -*-
# vim:fenc=utf-8

import csv

# 読み込みファイル
in_file = 't.csv'
fr = open(in_file, "r")
readcsv = csv.reader(fr)
data = [ v for v in readcsv ] # 読み込みCSVファイルデータをリストのリストで取得

col = len(data)       # 行
row = len(data[0])*2  # 列 # 変更後の列は (読み込みCSVファイルの列) x2のため"*2"

# 変更後の配列が入るオブジェクト
# 空の(col x row)配列を作成
cnv = []
for i in range(col):
   tmp = []
   for j in range(row):
       tmp.append('')
   cnv.append(tmp)

# すべて空列のcnvに2列ごとに読み込みCSVデータ列を入れる処理
for i in range(col):
    for j in range(row // 2):
        # 2 x jの列に jの列のdataデータを代入
        cnv[i][2*j] = data[i][j]

# 書き込みファイル
fw = open('t-out.csv', 'w')
writer = csv.writer(fw, lineterminator='\n')
writer.writerows(cnv)
fw.close()

fr.close()
2016年1月23日土曜日
Pythonで画像認識にチャレンジのソースコード
「データサイエンティスト養成読本 機械学習入門編」
特集4 Pythonで画像認識にチャレンジ
第3章 リスト1 単純なパターンマッチング のコードがネット上になかったため、書いた。
https://github.com/tomoobata/ML_DS_Training/blob/master/ch3_1.py
http://mapodou.hatenablog.com/entry/2016/01/05/063000
感想:
しっかしもって処理に時間がかかる。
1枚の画像のマッチングに5,6秒とかやってられない。
デジカメやらスマホカメラのリアルタイムでの顔認識とかスマイル認識みたいなものは、まったく別のアルゴリズムなのか??と素朴な疑問。
>> 追記
顔認識アルゴリズムはいろいろ高速なものがあるようだが、それは置いておいて、OpenCVを入れて顔認識を試してみた。
https://github.com/tomoobata/ML_DS_Training/blob/master/cv.py
さすがにこれは速い。1秒掛からず顔認識した。すげー!
参照:
http://www.non-fiction.jp/2015/08/14/face-detect/
http://www.takunoko.com/blog/python%E3%81%A7%E9%81%8A%E3%82%93%E3%81%A7%E3%81%BF%E3%82%8B-part1-opencv%E3%81%A7%E9%A1%94%E8%AA%8D%E8%AD%98/
特集4 Pythonで画像認識にチャレンジ
第3章 リスト1 単純なパターンマッチング のコードがネット上になかったため、書いた。
https://github.com/tomoobata/ML_DS_Training/blob/master/ch3_1.py
ちなみに
ax2.add_patch(plt.Rectangle((y,x),tw,th, edgecolor='w', facecolor='none',linewidth=2.5))
という行が間違えていて次が正しいようだ。
rect = plt.Rectangle((y,x),tw,th, edgecolor='w', facecolor='none',linewidth=2.5)
あと第3章 リスト2のコードは、こちらの方が書かれていた。
http://mapodou.hatenablog.com/entry/2016/01/05/063000
感想:
しっかしもって処理に時間がかかる。
1枚の画像のマッチングに5,6秒とかやってられない。
デジカメやらスマホカメラのリアルタイムでの顔認識とかスマイル認識みたいなものは、まったく別のアルゴリズムなのか??と素朴な疑問。
>> 追記
顔認識アルゴリズムはいろいろ高速なものがあるようだが、それは置いておいて、OpenCVを入れて顔認識を試してみた。
https://github.com/tomoobata/ML_DS_Training/blob/master/cv.py
さすがにこれは速い。1秒掛からず顔認識した。すげー!
参照:
http://www.non-fiction.jp/2015/08/14/face-detect/
http://www.takunoko.com/blog/python%E3%81%A7%E9%81%8A%E3%82%93%E3%81%A7%E3%81%BF%E3%82%8B-part1-opencv%E3%81%A7%E9%A1%94%E8%AA%8D%E8%AD%98/
2016年1月22日金曜日
Python をWeb経由で実行させる方法
php のexec()関数を使って

< ?php
    $PythonPath =
      'python ./cgi-bin/test.py;
    exec($fullPath);
? >
とするのが手っ取り早くできた。
参照 http://freetech-e.com/html/callpython.htm
2016年1月17日日曜日
pythonでのコピー
python での値のコピー
a=b とやると値参照になるので注意!!
http://bugrammer.g.hatena.ne.jp/nisemono_san/20111210/1323444429
http://lightson.dip.jp/zope/ZWiki/084_e9_85_8d_e5_88_97_e3_82_92_e8_a4_87_e8_a3_bd_e3_81_99_e3_82_8b
a=b とやると値参照になるので注意!!
http://bugrammer.g.hatena.ne.jp/nisemono_san/20111210/1323444429
http://lightson.dip.jp/zope/ZWiki/084_e9_85_8d_e5_88_97_e3_82_92_e8_a4_87_e8_a3_bd_e3_81_99_e3_82_8b
pythonでの配列のコピー
   >>> import copy
   >>> e = copy.deepcopy(d)
   >>> b[0] = "b"
   >>> d
   (['a', 1, 2], ['b', 4, 5])
   >>> e
   (['a', 1, 2], [3, 4, 5])
pythonで転置行列にする(Numpyなし)
文字列を行列に含んでいるとNumpyでは面倒なので調べた。
参照: http://asiagohan.hatenablog.com/entry/2015/05/08/170715
こちらのやり方もできた。
http://lightson.dip.jp/blog/seko/2830
data =
[['O', 'A', 'B', 'C', 'D', 'E', 'F'],
 ['P', 'A11', 'A12', 'A13', 'A14', 'A15', 'A16'],
 ['Q', 'A21', 'A22', 'A23', 'A24', 'A25', 'A26'],
 ['R', 'A31', 'A32', 'A33', 'A34', 'A35', 'A36']]
のとき、

data2 = list(map(list, zip(*data)))
とするとできた。
data2 =
[['O', 'P', 'Q', 'R'],
 ['A', 'A11', 'A21', 'A31'],
 ['B', 'A12', 'A22', 'A32'],
 ['C', 'A13', 'A23', 'A33'],
 ['D', 'A14', 'A24', 'A34'],
 ['E', 'A15', 'A25', 'A35'],
 ['F', 'A16', 'A26', 'A36']]
参照: http://asiagohan.hatenablog.com/entry/2015/05/08/170715
こちらのやり方もできた。
http://lightson.dip.jp/blog/seko/2830
def invert_lst(lst):
       col = len(lst[0])
       row = len(lst)
       inv = []
       for i in range(col):
               l = []
               for j in range(row):
                       l.append('')
               inv.append(l)
       for i in range(row):
               for j in range(col):
                       inv[j][i] = lst[i][j]
       return inv

lst = [[1,2,3],[1,2,3],[1,2,3],[1,2,3],[1,2,3]]
print invert_lst(lst)

>>>[[1, 1, 1, 1, 1], [2, 2, 2, 2, 2], [3, 3, 3, 3, 3]]
pythonでループでのインデックス
pythonでループでのインデックス

>>> list1 = ['a', 'b', 'c']
>>> for (i, x) in enumerate(list1):
...   print i,x
...
0 a
1 b
2 c
pythonで多次元配列の行と列の長さ取得
pythonで多次元配列の行と列の長さ取得
list = [[1, 2, 3], [4, 5, 6]] # 2x3行列のとき
print len(list) # 表示されるのは 2。 行の長さ
print len(list[0]) # 表示されるのは 3。列の長さ
list = [[1, 2, 3], [4, 5, 6]] # 2x3行列のとき
print len(list) # 表示されるのは 2。 行の長さ
print len(list[0]) # 表示されるのは 3。列の長さ
2016年1月14日木曜日
2016年1月1日金曜日
Cousera Machine Learning / week5-5 めも
Gradient Checking

epsilon = 1e-4;
for i = 1:n,
  thetaPlus = theta;
  thetaPlus(i) += epsilon;
  thetaMinus = theta;
  thetaMinus(i) -= epsilon;
  gradApprox(i) = (J(thetaPlus) - J(thetaMinus))/(2*epsilon)
end;

次をチェックする
gradApprox ≈ DVec
Cousera Machine Learning / week5-4 めも
Implementation Note: Unrolling Parameters 授業メモ
function [jVal, gradient] = costFunction(theta)
...

optTheta = fminunc(@costFunction. initalTheta, options)

Neural Network(L-4):
 theta  matrices (Theta1, Theta2, Theta3)
 D matrices (D1, D2, D3)

 -------------------------
thetaVec = [Theta1(:), Theta2(:); Theta3(:)];
DVec = [D1(:); D2(:); D3(:)];

ここでTheta1(:)の意味は、Theta1の各要素をすべて列にしたもの
つまり
octave:7> b=[1 3; 2 4]
b =
   1   3
   2   4
があったっとき、b(:)は、次のようになる
octave:8> b(:)
ans =
   1
   2
   3
   4
-------

Theta1 is 10x11, Theta2 is 10x11 and Theta3 is 1x11

Theta1 = reshape(thetaVector(1:110),10,11)
Theta2 = reshape(thetaVector(111:220),10,11)
Theta3 = reshape(thetaVector(221:231),1,11)

reshape関数は、reshape(a, size)のように書いて次のように行列の変形をできる
> reshape([1,2,3,4], 2,2)
ans =
   1   3
   2   4

---------
octave:1> Theta1=ones(10,11)
Theta1 =
   1   1   1   1   1   1   1   1   1   1   1
   1   1   1   1   1   1   1   1   1   1   1
   1   1   1   1   1   1   1   1   1   1   1
   1   1   1   1   1   1   1   1   1   1   1
   1   1   1   1   1   1   1   1   1   1   1
   1   1   1   1   1   1   1   1   1   1   1
   1   1   1   1   1   1   1   1   1   1   1
   1   1   1   1   1   1   1   1   1   1   1
   1   1   1   1   1   1   1   1   1   1   1
   1   1   1   1   1   1   1   1   1   1   1

octave:2> Theta2=2*ones(10,11)
Theta2 =
   2   2   2   2   2   2   2   2   2   2   2
   2   2   2   2   2   2   2   2   2   2   2
   2   2   2   2   2   2   2   2   2   2   2
   2   2   2   2   2   2   2   2   2   2   2
   2   2   2   2   2   2   2   2   2   2   2
   2   2   2   2   2   2   2   2   2   2   2
   2   2   2   2   2   2   2   2   2   2   2
   2   2   2   2   2   2   2   2   2   2   2
   2   2   2   2   2   2   2   2   2   2   2
   2   2   2   2   2   2   2   2   2   2   2

octave:3> Theta3=3*ones(1,11)
Theta3 =
   3   3   3   3   3   3   3   3   3   3   3
> ThetaVec =[ Theta1(:); Theta2(:); Theta3(:) ];
octave:10> size(ThetaVec)
ans =
   231     1
ここでsizeは行列のサイズを返し、次のようになる
> a=[1,2;3,4;5,6]
a =
  1  2
  3  4
  5  6
octave> size(a)
ans =
  3  2
octave> size(a,1)
ans =  3
octave> size(a,2)
ans =  2

1> reshape(ThetaVec(1:110), 10, 11)
ans =
   1   1   1   1   1   1   1   1   1   1   1
   1   1   1   1   1   1   1   1   1   1   1
   1   1   1   1   1   1   1   1   1   1   1
   1   1   1   1   1   1   1   1   1   1   1
   1   1   1   1   1   1   1   1   1   1   1
   1   1   1   1   1   1   1   1   1   1   1
   1   1   1   1   1   1   1   1   1   1   1
   1   1   1   1   1   1   1   1   1   1   1
   1   1   1   1   1   1   1   1   1   1   1
   1   1   1   1   1   1   1   1   1   1   1
---------------
2015年12月31日木曜日
Cousera Machine Learning / week4 ex3の課題めも
わからなかった点めも
oneVsAll.m - Train a one-vs-all multi-class classifier
を埋める箇所がさっぱりもってわからない。
fmincg ( @(t)(lrCostFunction(t, X, (y == c), lambda)), ...
の @(t)(lrCostFunction はいったい何をしているんだ??
>> 関数の引数に関数を渡す時には @ を付ける。
http://qiita.com/naoya_t/items/e195a05f43cab0b1ecdc
とのこと。なるほど。
しかし、@(t), lrCostFunction(t は何??
よくわからない。。。
predictOneVsAll.mの max(A, [], 2)について
http://www.obihiro.ac.jp/~suzukim/masuda/octave/html/octave_94.html
max (x, y, dim)
[w, iw] = max (x)
引数としてベクトルを渡すと,その要素の最大値を返す。 行列を渡すと,各列ごとに最大値を返すので,結果は行ベクトルとなる。 dim を指定すると,その次数を指定することができる。
2つの行列(あるいは行列とスカラ)を渡すと,対で比較した結果を返す。
1つの入力に対して2つの返り値を受け取るとき,
例)
[x, ix] = max ([1, 3, 5, 2, 5])
x = 5
ix = 3
predictOneVsAll.mの predictOneVsAll(all_theta, X)では、sigmoid(X * all_theta')を最大にするる
index(kabel)を求めればよいか。
oneVsAll.m - Train a one-vs-all multi-class classifier
を埋める箇所がさっぱりもってわからない。
fmincg ( @(t)(lrCostFunction(t, X, (y == c), lambda)), ...
の @(t)(lrCostFunction はいったい何をしているんだ??
>> 関数の引数に関数を渡す時には @ を付ける。
http://qiita.com/naoya_t/items/e195a05f43cab0b1ecdc
とのこと。なるほど。
しかし、@(t), lrCostFunction(t は何??
よくわからない。。。
predictOneVsAll.mの max(A, [], 2)について
http://www.obihiro.ac.jp/~suzukim/masuda/octave/html/octave_94.html
max (x, y, dim)
[w, iw] = max (x)
引数としてベクトルを渡すと,その要素の最大値を返す。 行列を渡すと,各列ごとに最大値を返すので,結果は行ベクトルとなる。 dim を指定すると,その次数を指定することができる。
2つの行列(あるいは行列とスカラ)を渡すと,対で比較した結果を返す。
1つの入力に対して2つの返り値を受け取るとき,
max関数は,最大値に対応する要素の位置も返す。例)
[x, ix] = max ([1, 3, 5, 2, 5])
x = 5
ix = 3
predictOneVsAll.mの predictOneVsAll(all_theta, X)では、sigmoid(X * all_theta')を最大にするる
index(kabel)を求めればよいか。
論理演算のめも
Cousera Machine Learning / week4 Examples and Intuitions I, II
に出てきた論理演算のめも
A|B| A AND B
0|0| 0
1|0| 0
0|1| 0
1|1| 1
A|B| A OR B
0|0| 0
1|0| 1
0|1| 1
1|1| 1
A| Not A
0| 1
1| 0
A|B| A NOR B ==> (Not A) AND (Not B)
0|0| 1
1|0| 0
0|1| 0
1|1| 0
A|B| A XOR B
0|0| 0
1|0| 1
0|1| 1
1|1| 0
A|B| A XNOR B
0|0| 1
1|0| 0
0|1| 0
1|1| 1

A|B| A AND B
0|0| 0
1|0| 0
0|1| 0
1|1| 1
A|B| A OR B
0|0| 0
1|0| 1
0|1| 1
1|1| 1
A| Not A
0| 1
1| 0
A|B| A NOR B ==> (Not A) AND (Not B)
0|0| 1
1|0| 0
0|1| 0
1|1| 0
A|B| A XOR B
0|0| 0
1|0| 1
0|1| 1
1|1| 0
A|B| A XNOR B
0|0| 1
1|0| 0
0|1| 0
1|1| 1

Cousera Machine Learning / week3 ex2の課題めも
わからなかった点めも
sigmoid.m - Sigmoid Function のコードを埋める箇所がどうもよくわからない。
g = 1./(1+exp(-z));
とドット"."をなぜここに入れる?
zが行列で要素のみ演算させるのはわかるが、
なぜ、g = 1./(1+exp(-z.)) や、g = 1/((1+exp(-z.)).)でないのか。
>>追記
for ループを使うと次と同じ。
for i=1:size(z,1),
    for j=1:size(z,2),
                g(i,j) = 1/(1+exp(-1*z(i,j)));
        end
end

sizeは行列のサイズを返し、次のようになる
> a=[1,2;3,4;5,6]
a =
  1  2
  3  4
  5  6
octave> size(a)
ans =
  3  2
octave> size(a,1)
ans =  3
octave> size(a,2)
ans =  2
2015年12月30日水曜日
python scikit-learnでの線形回帰
データサイエンティスト養成読本 機械学習入門編
http://gihyo.jp/book/2015/978-4-7741-7631-4
[scikit-learn 入門]リスト1のコードめも
list1.py (python scikit-learnでの線形回帰)
----------------------------------------------
実行結果
$ python list1.py
('coef and intercept :', array([ 42.85335573]), -1.6283636540614475)
('score :', 0.80333572865564495)

http://gihyo.jp/book/2015/978-4-7741-7631-4
[scikit-learn 入門]リスト1のコードめも
list1.py (python scikit-learnでの線形回帰)
----------------------------------------------
# coding:utf-8

import numpy as np
import matplotlib.pyplot as plt
from sklearn import linear_model, datasets

# 乱数によりデータ生成
np.random.seed(0) # 乱数の種を設定。これを設定しないと実行する度に違うデータを生成
regdata = datasets.make_regression(100, 1, noise=20.00)
# make_regression の第1引数:サンプル数, 第2引数:フィーチャー数(入力データの次元), 第3引数:ノイズの大きさ

# 学習を用いてモデルパラメータを表示
lin = linear_model.LinearRegression() # 線形回帰のインスタンス生成
lin.fit ( regdata[0], regdata[1] )   # フィッティングの計算
print ( "coef and intercept :", lin.coef_, lin.intercept_ )  # 回帰直線を y =ax + b とすると lin.coef_:係>数a, lin.intercept_:切片b
print ( "score :", lin.score(regdata[0],regdata[1]) ) # どのくらいうまくあてはまっているかスコア。値が大きいほど良い

# グラフを描画
xr = [-2.5, 2,5]
plt.plot (xr, lin.coef_ * xr + lin.intercept_)  # 回帰直線を描画
plt.scatter ( regdata[0], regdata[1])           # データ点を描画

plt.show()
----------------------------------------------
実行結果
$ python list1.py
('coef and intercept :', array([ 42.85335573]), -1.6283636540614475)
('score :', 0.80333572865564495)

2015年12月29日火曜日
2015年12月27日日曜日
Octave でのcsvファイル読込み
Cousera Machine Learning / week1
QUIZ Linear Regression with One Variable
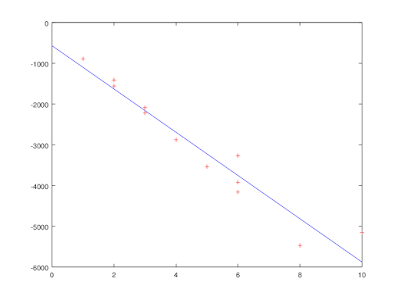
の問題2.で調べるのに使った。
問題はRetake毎に変わるようだ。

次のcsvファイルがあるとき
$ cat week2q2.csv
1,-890
2,-1411
2,-1560
3,-2220
3,-2091
4,-2878
5,-3537
6,-3268
6,-3920
6,-4163
8,-5471
10,-5157
次のように読み込む
octave:1> M=csvread('week2q2.csv')
M =
      1   -890
      2  -1411
      2  -1560
      3  -2220
      3  -2091
      4  -2878
      5  -3537
      6  -3268
      6  -3920
      6  -4163
      8  -5471
     10  -5157

赤色「r」のマーカー「+」でプロット。
octave:2> plot(M(:,1),M(:,2),'r+')
x を0から10まで1刻みで用意
octave:3> x=0:1:10
x =
    0    1    2    3    4    5    6    7    8    9   10
y1= -569.6 - 530.9 * x;
octave:6> plot(M(:,1),M(:,2),'r+')

hold on コマンドでグラフを重ねて描く
octave:7> hold on
octave:8> plot (x, y1)
できた。
一応、ブログアップ用に画像保存
octave:9> print -dpng 'week2q2.png'

2015年12月21日月曜日
Roundcube パスワード変更プラグイン
Roundcube でパスワード変更を
password plugin の設定でchpasswd を使ってできるようにした。
http://blog.pastwind.org/2015/01/roundcubepassword-plugin-chpasswd-driver.html
こちらのサイトがかなり参考になった。って中国語なんだけど、ほぼ英語なので理解できた。
感謝!
が、同じように設定すると次のエラー
PHP Error: Password plugin: Unable to execute sudo /usr/sbin/chpass-wrapper.py
↓ここのサイトに答えがありました。
http://www.studio-soleil.com/bloody-mary/wordpress/archives/2244.html
ありがとうございます!
visudoで
requiretty を無効にすれば良い。
これで、roundcube 上でパスワード変更できるようになった。
が、しかし、これでは、1文字のパスワードにも変更できてしまう!
ということで、
chpass-wrapper.py 内にパスワードポリシーを設定した。
if username in BLACKLIST:
sys.exit('Changing password for user %s is forbidden (user blacklisted)' %
username)
の行の下に次を追加した。
import re
if len(password) < 14:
sys.exit('Please set a password to more than 14 characters')
elif re.search( "[0-9]", password) ==None:
sys.exit('Please put in the number 1 or more characters')
elif re.search( "[a-z]", password) ==None:
sys.exit('Please put the lower case alphanumeric or more characters')
elif re.search( "[A-Z]", password) ==None:
sys.exit('Please put the upper case alphanumeric or more characters')
14文字以内または、数字、小文字英字、大文字英字を含まない場合は、パスワード変更を受け付けないようにした。
'Please set a password to more than 14 characters' とか、
エラーメッセージを書いたが、このメッセージはWeb上のRoundcubeには出て来ないが。。。ここはまたの機会に。
password plugin の設定でchpasswd を使ってできるようにした。
http://blog.pastwind.org/2015/01/roundcubepassword-plugin-chpasswd-driver.html
こちらのサイトがかなり参考になった。って中国語なんだけど、ほぼ英語なので理解できた。
感謝!
が、同じように設定すると次のエラー
PHP Error: Password plugin: Unable to execute sudo /usr/sbin/chpass-wrapper.py
↓ここのサイトに答えがありました。
http://www.studio-soleil.com/bloody-mary/wordpress/archives/2244.html
ありがとうございます!
visudoで
requiretty を無効にすれば良い。
これで、roundcube 上でパスワード変更できるようになった。
が、しかし、これでは、1文字のパスワードにも変更できてしまう!
ということで、
chpass-wrapper.py 内にパスワードポリシーを設定した。
if username in BLACKLIST:
sys.exit('Changing password for user %s is forbidden (user blacklisted)' %
username)
の行の下に次を追加した。
import re
if len(password) < 14:
sys.exit('Please set a password to more than 14 characters')
elif re.search( "[0-9]", password) ==None:
sys.exit('Please put in the number 1 or more characters')
elif re.search( "[a-z]", password) ==None:
sys.exit('Please put the lower case alphanumeric or more characters')
elif re.search( "[A-Z]", password) ==None:
sys.exit('Please put the upper case alphanumeric or more characters')
14文字以内または、数字、小文字英字、大文字英字を含まない場合は、パスワード変更を受け付けないようにした。
'Please set a password to more than 14 characters' とか、
エラーメッセージを書いたが、このメッセージはWeb上のRoundcubeには出て来ないが。。。ここはまたの機会に。
2015年12月19日土曜日
Octaveの警告pstoedit binary is not available.
Cousera Machine Learning/week2-2-4
Plotting Data
t=[0:0.01:0.98];
y1=sin(2*pi*4*t);
plot(t,y1);
y2=cos(2*pi*4*t);
重ねてグラフ表示をしたい場合
hold on
plot(t, y1, 'r');
> print -dpng 'TEST_octave.png'
と実行したら、次の警告が出てしまった。
warning: print.m: fig2dev binary is not available.
Some output formats are not available.
warning: print.m: pstoedit binary is not available.
Some output formats are not available.
CentOS7 上でOctaveを動かしていたが、グラフの保存ができないか?
yum install transfig
を実行して、警告は減ったが
warning: print.m: pstoedit binary is not available.
というエラーの方は出ている。
どうにもこの警告が消えない。
が、これは大して問題ではないようだ。
Plotting Data
t=[0:0.01:0.98];
y1=sin(2*pi*4*t);
plot(t,y1);
y2=cos(2*pi*4*t);
重ねてグラフ表示をしたい場合
hold on
plot(t, y1, 'r');
> print -dpng 'TEST_octave.png'
と実行したら、次の警告が出てしまった。
warning: print.m: fig2dev binary is not available.
Some output formats are not available.
warning: print.m: pstoedit binary is not available.
Some output formats are not available.
CentOS7 上でOctaveを動かしていたが、グラフの保存ができないか?
yum install transfig
を実行して、警告は減ったが
warning: print.m: pstoedit binary is not available.
というエラーの方は出ている。
どうにもこの警告が消えない。
が、これは大して問題ではないようだ。
2015年12月16日水曜日
最急降下法
Coursera Machine Learning
https://www.coursera.org/learn/machine-learning/
week1
Parameter Learning/Gradient Descent
最急降下法というのがようやく腑に落ちて納得できた。
最急降下法(Wikipedia)
Google TensorFlowの"GET STARTED"に出てくる
https://www.coursera.org/learn/machine-learning/
week1
Parameter Learning/Gradient Descent
最急降下法というのがようやく腑に落ちて納得できた。
最急降下法(Wikipedia)
Google TensorFlowの"GET STARTED"に出てくる
optimizer = tf.train.GradientDescentOptimizer(0.5)という行のコードがなんとなくわかった。Google TensorFlowは、まだまだ使い方がよくわからないけども。
登録:
投稿 (Atom)